• Home
  • About
    • Link Love
  • Press
  • Contact

A New York City Health and Beauty Blog

Fall/Winter 2011 Nail Trends

March 7, 2011

During NY Fashion Week clothes weren’t the only thing that we had our eyes on. Makeup and nails are as important to a polished look as a handbag and shoes. Many of our favorite nail looks consisted of not just one shade of lacquer but sometimes up to three different shades. Spotted on the runways were rich elegant jewel tones, muted earth tones are even texture. The nail colors are included so that you can do it yourself! Let’s  take a closer look at some of the looks that we spotted on the runway.

The first look that I fell in love with was at 3.1 Phillip Lim, by simply painting the arcs of our nails we can create a pretty modern manicure.

CND nail polish at 3.1 Phillip Lim
CND nail polish: Desert Suede and arcs in Midnight Sapphire

Another manicure that stood out were the nails at Monique Lhuillier. This subtle play on a french manicure is modern and sexy with just a sliver of color on the tips.

Monique Lhuillier Fall 2011
CND Nail Polish: Silver Chrome, Desert Suede, Dark Amethyst

Jason Wu also gave a modern day twist to the french manicure by using deep burgundy and gold.
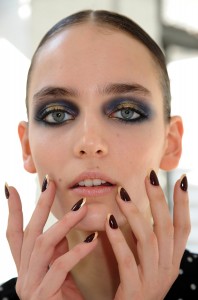
CND Nail Polish at Jason Wu Fall 2011
CND Nail Polish: Gold Chrome, Dark Ruby and Bloodline

Aside from the twists on french manicures, there were more demure but equally beautiful options. Another stunning manicure was at Catherine Malandrino runway show. To achieve this dreamy look apply one coat of Dark Ruby, one coat of Copper Shimmer and one coat of Super Matte Top Coat then carefully blot with a pad.

CND Nails at Catherine Malandrino
CND: Dark Ruby, Copper Shimmer

Kevork Kiledjian (in his first runway show in NYC) presented models with oval shaped nails in Desert Suede, I love the simple elegance.

CND at Kevork Kiledjian
CND nail polish: Desert Suede

At Jenni Kane nail artists created a sueded effect by combining Desert Suede, Copper Shimmer and Sheer Rose Water. The look was then finished with Super Matte Topcoat & Solar Speed Spray.

CND Jenni Kayne
CND nail polish: Desert Suede, Copper Shimmer, Sheer Rose Water

To achieve some of these beautiful manicures you can purchase CND The Look: Fall 2011 box set of Midnight Sapphire and Dark Amethyst Colours and Sheer 24K Sparkle Effect. The set is $29 and will be available in September 2011. For more information, please visit CND.com.

What was your favorite look for the 2011 Fall/Winter shows?

[Images courtesy of CND]
1 Comment
Filed Under: Nail Polish Tagged: 3.1 Phillip Lim Fall 2011, CND, CND Fall 2011, CND Nail Polish, Creative Nail Design, Do it yourself, Fall/Winter 2011 Nail Trends, Monique Lhuillier Fall 2011, nail trends, Sheer 24K Sparkle Effect

Looking Polished: Do It Yourself Manicure

March 3, 2010

One of the easiest ways to maintain a polished appearance is to keep your nails manicured. It’s one of the least expensive beauty routines that you can indulge in to help spruce up your appearance. Beautifully manicured nails are as important as the clothes that you wear, after all you can’t turn of the TV or open a fashion magazine without viewing a woman with perfectly manicured fingernails. Polished nails are like the icing on the cake and better than therapy, they just make you feel good! As women getting our nails done has become almost an important ritual for all of the important things in our lives. Just think for a moment about all the times that we get our nails done ~ for a job interview, when we get engaged, on our wedding day, girls night out or even as a part of our weekly beauty routine.

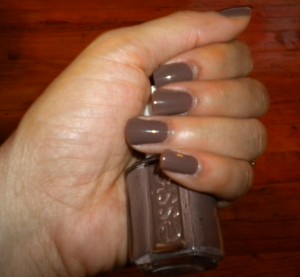
Essie Nail Polish

I love getting my nails done at my favorite nail spa but sometimes I like to do my own nails. These are the steps that I take for an at home manicure:

1. Wash and dry your hands

2. Remove nail polish with a non-acetone remover. Even if you don’t have polished nails swiping your nails with remover is a good idea to remove the oils on your nails which can cause “bubbles” under the polish.

3. Trim nails, then file in square (or oval) shape. Try to avoid running that nail file back and forth to avoid weakening your nails.

4. Rub a little cuticle cream on (I like to use olive oil or vitamin e oil) to moisturize your cuticles and push them back with an orange stick (do not cut your cuticles).

5. Smooth your nails with a buffer so that the polish has a smooth surface to adhere to. I also like to buff my cuticles as well for a smoother appearance.

6. Apply a base coat.

7. Apply two coats of your favorite shade of nail polish. I’m using Essie Mink Muffs in the picture above.

8. Apply a clear top coat for that extra shine and to help your manicure last!

It usually takes my nails about 15 minutes to dry. I also run cold water my your fingernails to help dry my nails a tad be quicker so I usually do that after I’ve dried my nails for a few minutes. Lastly, I apply clear polish every few days to help my manicure last a bit longer and remain chip proof. I’d be curious to see what other ladies do when they give themselves at home manicures. What are your secrets?

2 Comments
Filed Under: Nail Polish Tagged: at home manicure, Do it yourself, Essie, look polished, Manicure, Mink Muffs, Nail Polish

Sponsors

cheap nail polish

Search

Awards

View this SkinnyScoop List
Top 100 Beauty & Fashion Blogs of 2012 by Skincare-news.com

EverydaySale.co.uk

Subscribe Via Email

Enter your email address:


Delivered by FeedBurner

Lipstick and Luxury Archives

Networks


Beauty Blogs - BlogCatalog Blog Directory


POPSUGAR Select Beauty


Theme Design By Studio Mommy · Copyright © 2023

Copyright © 2023 · Classy Ink Theme on Genesis Framework · WordPress · Log in